Want a 3D printing project that will hone your design and circuitry skills, all while giving you a butterfly ring that flutters with light? Then break out of that cocoon and build yourself this 3D printed NeoPixel butterfly ring.
When used as a standalone technology, 3D printing is capable of producing some amazing trinkets, jewelry and other wearable accessories. But when fused with electronics, the possibilities of what you can make grows exponentially. One common and easy-to-learn path you can take on your maker quest is with Arduino circuit boards and LED lights.
But for the novice, it might seem like a daunting task to learn soldering circuitry and 3D design. In reality, it’s less demanding than you might expect, and this recent Instructables project will help you learn all the nitty gritty details. By the time you finish this lesson, you’ll have yourself 3D printed NeoPixel butterfly ring that will brighten up your weekend!
Let’s take a closer look at this informative and fun project.
3D Printed NeoPixel Butterfly Ring: What You Need?
If you want to create your own 3D printed butterfly ring, you’ll need to acquire some electronic components and tools. Here’s what you need:
The STL files for the butterfly and NeoPixel holder are available on the Instructables post.
3D Printed NeoPixel Butterfly Ring: Putting it Together
If you want to design your own butterfly, the circuits Instructables post shares comprehensive steps on how to design both the ring and LED holder on TinkerCAD. It also shows you how to create a circuit with an Arduino Uno and NeoPixel Ring, how to start coding with the NeoPixel library and programming your LED to go into rainbow mode. For time’s sake, we’ll jump straight into the 3D printing process, but if you’re interested in learning how to do everything from scratch, start from the top of the project’s Instructables page.
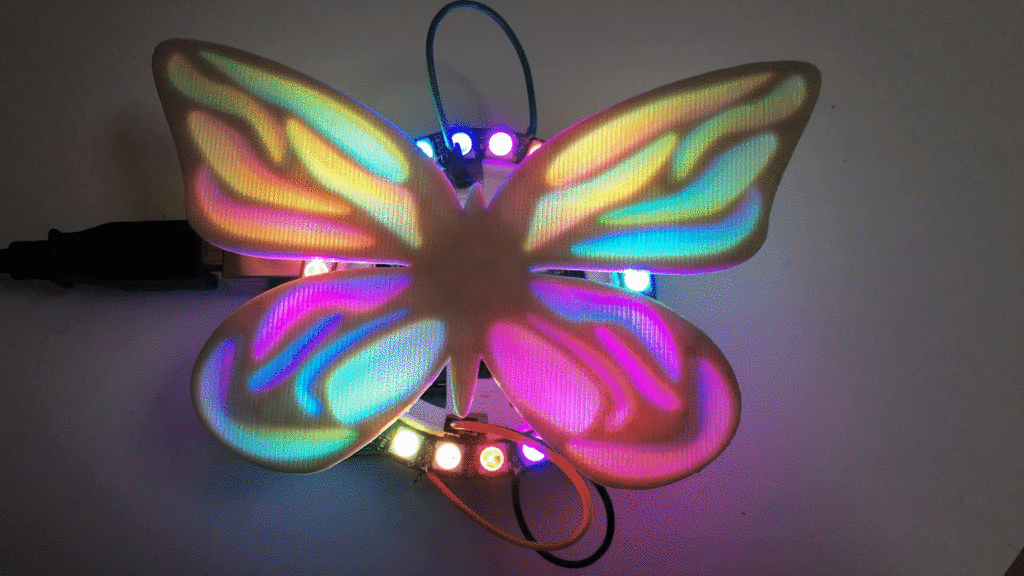
The NeoPixel Butterfly Ring only requires two 3D printed parts: the butterfly and the NeoPixel holder. Both are 3D printed with 100 percent infill, the holder with supports. If you want to maximize the light the shines through the butterfly, look into utilizing translucent or white PLA filament.
The next step is to put together the circuit and 3D printed holder, snuggly sandwiching the holder on top of the Arduino Uno. With the PWR and GND pins of the NeoPixel Ring facing downward, situate it around the 3D printed holder close to the “+” and “-” indicators.
If you look at the 3D printed holder, you’ll notice three holes for you to connect the NeoPixel ring to Arduino. Do the following: “Insert one end of a red jumper wire into the + hole of the holder. Make sure it’s fully inserted so that it makes a connection with the Arduino Uno 5V pin. Insert one end of a black jumper wire into the – hole of the holder. Make sure it’s fully inserted so that it makes a connection with the GND (Ground) pin of the Arduino.”
After stripping the wire ends, it’s finally time to solder the connections, each step is laid out in detail on the Instructables page. Finally, program the Arduino with the rainbow code and attach the butterfly! There you have it, time to let your finger flutter!
This project is multi-faceted depending on your experience level and free time. You can use the tutorials to learn more about using TinkerCAD and Arduino, or, you can just 3D print and solder away until you have a custom piece of jewelry. Happy tinkering!
Website: LINK