Step 01: The game
It’s Christmas Eve, ten to midnight in 2020. The moon is waxing gibbous, at a phase of
73%, the constellation of Orion stands as high in the sky as it gets from these latitudes,
and Santa is about to make his overhead pass. He is propelled through the sky by a
mixture of magic and the energetic shaking of his eager recipients – that’s you. His mission is to deliver every single copy of The MagPi magazine to the people waiting
below. He has two passes to the end of the screen and back. Will he make it, or will
some fall into the soggy snow?
Step 02: The controller

The hardware controller we are about to build is about as simple as it gets. It consists of
a tilt switch mounted in a plastic drinks bottle. This then connects to a GPIO pin on
Raspberry Pi, and the rest is software. We first used tilt switches in The MagPi issue 52 with the sliders game – coincidentally also a Christmas game, and one of
our favourites. But this time we only need one switch. We used a small (140mm) flip-top
drinks bottle from a discount supermarket, and mounted the switch in the top.
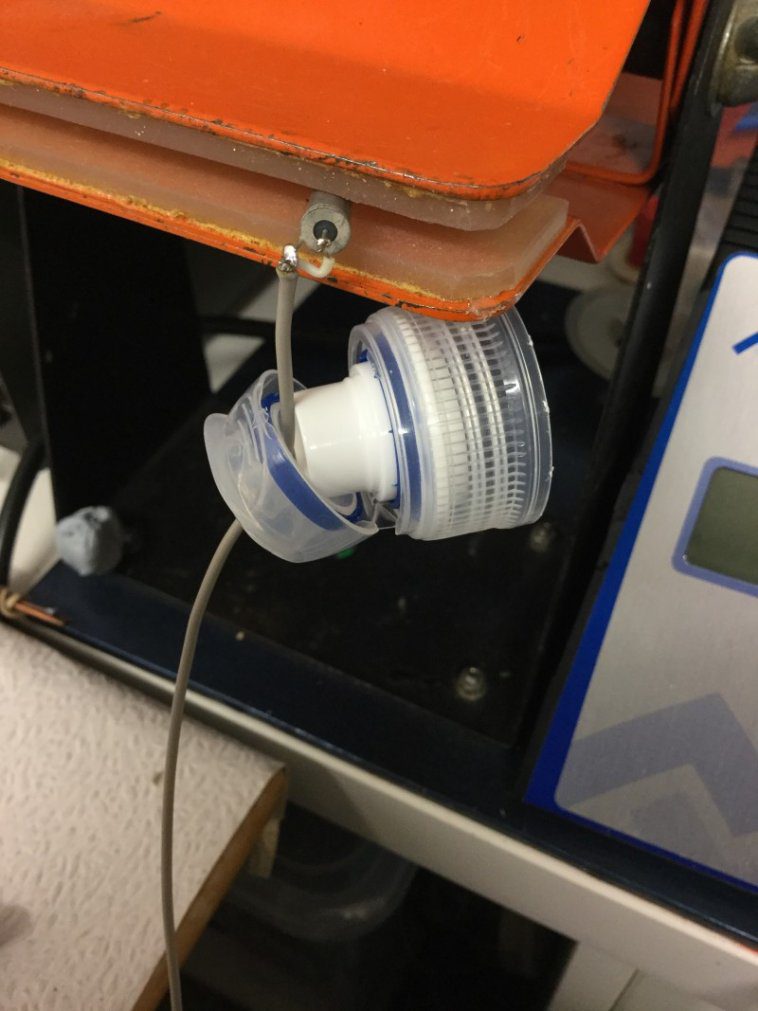
Step 03: Make your shaker
We used thin screened microphone wire for the connection; it is only 1.6mm in
diameter. This makes for a nice neat job, but any sort of wire will work. First we drilled a
2mm hole in the flip top cover, and then threaded the wire through. Then we trimmed
the wire on the tilt switch down to about 5mm and soldered a wire on each connector
(Figure 1). Then we pushed the tilt switch through into the bottle until the wires were
below the level of the rim, and flooded the top recess with hot-melt glue, ensuring the tilt
switch was vertical, as shown in Figure 2.
Step 04: Connecting to the GPIO pins

To connect the other end of the tilt switch to the GPIO pins, we used a ten-pin dual-row
header socket. We connected the wires to pins 2 and 9 of the header socket; this
corresponds to ground and GPIO 3, as shown in the photograph in Figure 3. We used an I2S pin because of the, already fitted, 1K8 (1.8kΩ) pull-up resistor to give it good immunity from interference. Figure 4 shows the physical layout diagram for the whole
interface. We then ran a short test program, available on our GitHub page, to check it worked.
Step 05: Graphics
One of the major components of this sort of project is the graphics, so we got them
together before starting on writing any code. We looked around the net for royalty-free
Christmas animated GIFs of Santa’s sleigh, and found a good one with seven reindeer.
This was too many for our needs, so we used a photo editing package to remove all but
the first pair. We split the GIF into its separate frames and started editing: first removing
excess reindeers, then making the background transparent, and finally adding the
Raspberry Pi logo onto the sides of the sleigh.
Step 06: Your first dashboard

Then we found a chimney and made it a double chimney with a copy and flip of the
original clip art. We also did some retouching on the snow line between the chimneys,
to make the transition smooth. Most importantly, we made the snow line at either side of
the chimneys end at the same height. Finally, we made two lengths of just plane snow:
one the same length as the chimneys, and the other half the length. In this way, we
could mix and match the graphic elements in the scrolling ground display.
Step 07: The MagPi covers
This could have been hard work, going through all the back issues online and taking
screen grabs, but fortunately the magazine was planning to put all the covers on the
front page of the 100th issue, so they had gathered them together already. We only had
to scale them, in our case to 50 pixels wide. The final element was the star-studded
background for Santa to ride across, but been very keen on astronomy, we wanted this
to be accurate, along with the position and phase of the moon. So we turned to a great
open-source planetarium package Stellarium.
Step 08: Stellarium

Stellarium has been around for at least 15 years and is, by now, a very sophisticated
product available free for all three major platforms. We used it to look at the sky as it
would be on Christmas Eve 2020. While leap years keep the stars in the same place at
a specific date from year to year, the moon’s position and phase will change. This year
the moon is waxing gibbous, at a phase of 73%. ‘Waxing’ means it is getting fuller day
by day, ‘gibbous’ means it’s between half and full, and "phase" is how much of the moon you can see.
Step 09: Poetic licence
We took a bit of poetic licence when it came to the size of the moon. When looking at it
in the sky, we actually perceive it to be bigger than it really is, so we enlarged the moon
to match our perceptions. Figure 5 shows the negative of the background image we
used. It also includes constellation lines and star names – note the position of Rigel in
the constellation of Orion, as it is a key point in the game. Stellarium is much more than
a simple planetarium and can animate all sorts of events like the analemma of the sun.
Step 10: Software

All the software and graphics files can be found on our GitHub page. You use the
shaker to propel Santa across the sky, and need to keep shaking to keep him going.
When you have positioned him correctly, you press the SPACE bar to release a copy of
The MagPi magazine, which then drops to the ground. The longer it descends, the
faster it drops, as the speed increases because of the acceleration due to gravity. The
forward speed of the drop, however, is constant. This adds a bit of realism to what is a
big suspension of disbelief.
Step 11: The drop
While the magazine is dropping, Santa’s forward speed is transferred to vertical speed,
allowing you to control his altitude. This is important, because aiming from low height is
easer, but you can only drop magazines if the runners on the sleigh are above Rigel. If
you attempt a drop and you are at the level of Rigel, you will be whooshed to the top of
the screen. If the magazine’s bottom-left or bottom-right corner intersects the hidden
capture rectangle on each chimney, it sticks there and is considered delivered; if not,
then it sinks into the snow and is lost.
Step 12: Winning the game

Santa makes two runs across the screen: right to left, then left to right. The objective is
to deliver all 100 issues of The MagPi magazine. The game stops when either you
complete the two runs or you run out of magazines. You get to see the total delivered at
the end, along with a round of applause. Figure 6 shows Santa on his return run
adding another magazine to those already delivered.
Next month, in part two, we will look at using two shakers. So get another tilt switch
while you are at it, to make more shaking fun.