A beans to an end
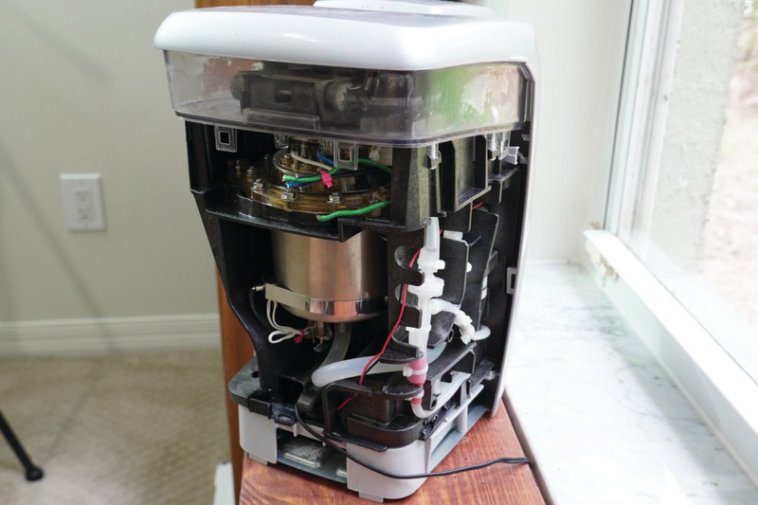
Having eventually figured out how to disassemble the original machine, Jeremy then turned his attentions to using its features in a new way. “There’s an air pump that, when activated, causes water (or presumably coffee) to go out the spout,” he says. “It seems that it pressurises the liquid chamber and forces water out this way… As for my setup, the Raspberry Pi activates this air pump at a certain time. The brew button is a manual trigger for watering. A soil moisture sensor tells the system when it’s thirsty (though doesn’t control it directly) – when dry, a red light built into the Keurig (and repurposed) lights up. A blue repurposed light signifies that it’s watering.”
Ingenious, and such a great way to redeploy something destined for the scrap-heap, but Jeremy admits that there were a few challenges along the way, including figuring out the button and light circuitry from only the wires: “I didn’t disassemble enough to actually see where they were going.”
He also admits that it does still require some fine-tuning, but he’s generally pretty happy with his new gardening aid. “I left the outer cover off as I think the internals look cool,” he adds, “but I hid all the extra parts in the original electronics cavity inside, so it does look mostly original, if partially disassembled.”

Fast Facts! Coffee Maker Greenhouse
This project took Jeremy 20–30 hours, over a period of around two months
He wrote this article on the build
A 3D-printed part houses a Raspberry Pi Zero W inside the machine
- Werbung -He also grows pineapples in pots made from disposable juice containers
His future project plans include a portable oscilloscope
One person’s rubbish…
Jeremy is not done tinkering just yet. “There’s an unused but hooked-up power button that I may do some sort of lighting test with,” he says. “I suppose it is an automatic watering system, but I’ve had the thought that I could put a tube on it and water larger plants. Again, more of a thought, but you could get like ten of these for a giant watering system. In this case, solar power would be good, but would kind of mess up the looks.”
Jeremy chose to use a Raspberry Pi Zero W because it was the perfect size to fit inside the Keurig’s electronics compartment, along with a mini breadboard. He has used Raspberry Pi computers before, including running his 3D printer via OctoPrint. “I also have a DIY NAS setup that runs on a Raspberry Pi 4,” he adds.
Online feedback on the watering machine has been positive, says Jeremy. “People seemed to think it was a neat idea when I told them about it before it was quite finished, or at least on the internet. I’ve gotten good feedback from YouTube etc.” Inspired yet? It just shows what you can do with a little imagination… and a Raspberry Pi, of course!